RocketHeader

Day 2- Customization

button (2)
Day 1
                                                                                                                                           Go to Day 3
button (2)


Customize your Schedule

Finally, you need to know who is supposed to be where, everyday. So let’s make sure your schedule is set up so you are able to schedule and dispatch effectively within ServiceMonster.

There are several settings that you are able to customize on your schedule to display the information that you need.

Color Wheel

The following settings update the Color Wheel that shows different colors on the schedule based on their position from your home address.

    • Max Driving Range – set to the farthest that you would drive for a job.
    • Home Zip Code – set the zip code of where your vehicles will be originating from.
    • Color Wheel – choose one of the options to change the colors in relation to direction.

Work Hours

    • Change the hours of operation that you want to display on the calendar.
    • To show 24 hours on the calendar, click the check box.

Schedule Memory

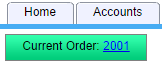
One order can have multiple jobs attached to it. This is useful if you need to schedule rework or have a multi-day job for a customer. After scheduling a job,

    • To turn on Schedule Memory, click the check box next to Remember last order after scheduling a job.
    • The current order being scheduled will show up in a green box in the upper left hand corner of the screen.

Current Order

View Detail Settings

There are several options to change the settings in both Daily and Weekly view. Click the check boxes next to the fields that you would like to show up for the scheduled job. To see the details on the schedule, in theScheduling toolbar click Show Details in either Daily or Weekly mode.

Detail Settings

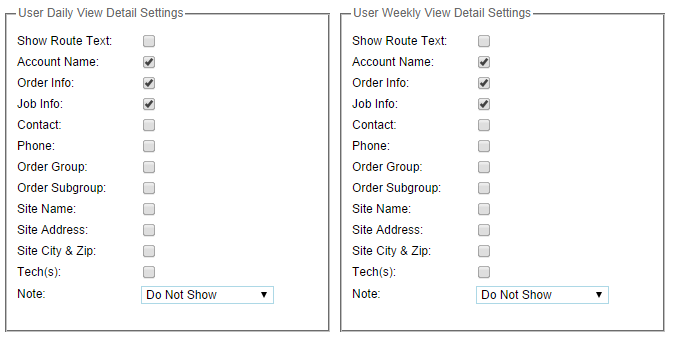
The default fields are:

    • Account Name
    • Order Info
    • Job Info

Once all settings are changed, click Save and Close.

Brand Yourself- Upload Your Logo

Upload your company’s logo, so that it can print on your work orders and invoices; branded forms look better to your customers.

  1. Go to your Company tab.
  2. In the toolbar, click Edit Logo.

Company - Edit Logo

  1. Click Choose File to upload your logo.
    • The logo should be one of the internet recognized image file formats like .bmp, .jpg or .gif.
    • The maximum allowable dimensions of your logo are 800 pixels by 800 pixels, 300 dpi.
  1. Click Save and your logo will be uploaded.

Brand Yourself More…

Your software should be a reflection of your business and it should be simple, and we can show you how to achieve both.

Just send us a line or give us a call; we’re always happy to help!

button (2)
Day 1
                                           Go to Day 3
button (2)


What’s Next?

Day 1: An Overview of ServiceMonster

Day 2: Let’s look at customizing your account.

1415139581_arrow-right-01-512Day 3: Let’s make sure you know how to read your dashboard.

Day 4: We’ll get to understand your Accounts and Products/Services.

Day 5: We’ll explore what you can do on the go.